Arduino IDE
The preferred way to build ESPEasy is using PlatformIO. However, there are still lots of people happily using Arduino IDE. Therefore we try to keep the project source compatible with Arduino IDE.
Since development is not done in Arduino IDE, it may happen that some commit breaks Arduino IDE compatibility. Usually it is something as simple as an include not being relative compared to the file which is being compiled. This is a bug, which PlatformIO does not complain about and thus can be missed easily during development.
If something like this happens, please open an issue (or pull request) for it on GitHub. Also, if someone knows a build flag for PlatformIO to signal those errors, please let us know.
Prepare Arduino IDE
When installing Arduino IDE, its default installation folder structure is to share libraries and sketches among all installations of Arduino IDE. If you only build one project, this is just fine. However, if you try to build several projects or versions of projects, then you will run into library dependency issues.
See: how to create portable version of Arduino IDE
For building ESPEasy it is adviced to use a “portable installation” of Arduino IDE.
Arduino IDE Prerequisites
For building ESPEasy in Arduino IDE, you need to install the board manager and ESP8266/ESP32 library.
See these excellent tutorials:
Download ESPEasy Sources
The sources can be downloaded from GitHub as ZIP file.
In this document, the given file system paths refer to a portable installation of Arduino IDE in D:\temp\Arduino-EspEasy\
The structure in the ZIP file are made for use in PlatformIO. To use the source in Arduino IDE, you have to split the sources into 2 parts:
The used libraries:
D:\temp\Arduino-EspEasy\portable\sketchbook\librariesThe source code:
D:\temp\Arduino-EspEasy\portable\sketchbook\ESPEasy
Some used libraries differ from the original ones to make them work with ESPEasy.
So make sure to use the ones supplied in the ZIP file in the lib folder.
If some libraries are missing from the lib folder, you can install them via the Arduino IDE library manager.
The source code files to be placed in the ESPEasy directory must be taken from the (first) src directory in the ZIP file.
Meaning the file ESPEasy.ino must be in the ESPEasy folder. (including all files in sub folders)
Building using Custom.h
There is a Custom-sample.h file supplied, which has lots of defines that can be set or uncommented to make a specific build
including just the plugins and controllers needed and maybe even some proper default settings.
To use this file, it must be renamed to Custom.h.
There are two options to define USE_CUSTOM_H for an Arduino IDE build:
In
ESPEasy_common.h: uncomment//#define USE_CUSTOM_HCreate a personal
platform.local.txtfile
Define USE_CUSTOM_H in ESPEasy_common.h
PlatformIO does recognize the presence of this file when building a Custom build environment.
But for Arduino IDE, a single line must be uncommented in ESPEasy_common.h
Make sure to uncomment this line at the start of ESPEasy_common.h: //#define USE_CUSTOM_H
This define makes sure the Custom.h file is actually included during build.
Build definition via platform.local.txt
Locate the file platform.txt in the esp8266 platform directory of ArduinoIDE.
The exact location depends on the installation, usually in a directory below the main application called hardware/esp8266.com/.
In the same directory add an (untracked) file called platform.local.txt with the following lines:
compiler.minsize=
compiler.c.extra_flags=-DUSE_CUSTOM_H -DPUYA_SUPPORT=0 -DCONFIG_FREERTOS_ASSERT_DISABLE -DCONFIG_LWIP_ESP_GRATUITOUS_ARP -DCONFIG_LWIP_GARP_TMR_INTERVAL=30 -DCORE_POST_2_5_0 -DCORE_POST_2_6_0 -DNDEBUG -DICACHE_FLASH -DWEBSERVER_RULES_DEBUG=0 -DVTABLES_IN_FLASH -mtarget-align -Werror=unused-variable {compiler.minsize}
compiler.c.elf.extra_flags=-DUSE_CUSTOM_H -DPUYA_SUPPORT=0 -DCONFIG_FREERTOS_ASSERT_DISABLE -DCONFIG_LWIP_ESP_GRATUITOUS_ARP -DCONFIG_LWIP_GARP_TMR_INTERVAL=30 -DCORE_POST_2_5_0 -DCORE_POST_2_6_0 -DNDEBUG -DICACHE_FLASH -DWEBSERVER_RULES_DEBUG=0 -DVTABLES_IN_FLASH -mtarget-align -Werror=unused-variable {compiler.minsize}
compiler.S.extra_flags=-DUSE_CUSTOM_H -DPUYA_SUPPORT=0 -DCONFIG_FREERTOS_ASSERT_DISABLE -DCONFIG_LWIP_ESP_GRATUITOUS_ARP -DCONFIG_LWIP_GARP_TMR_INTERVAL=30 -DCORE_POST_2_5_0 -DCORE_POST_2_6_0 -DNDEBUG -DICACHE_FLASH -DWEBSERVER_RULES_DEBUG=0 -DVTABLES_IN_FLASH -mtarget-align -Werror=unused-variable {compiler.minsize}
compiler.cpp.extra_flags=-DUSE_CUSTOM_H -DPUYA_SUPPORT=0 -DCONFIG_FREERTOS_ASSERT_DISABLE -DCONFIG_LWIP_ESP_GRATUITOUS_ARP -DCONFIG_LWIP_GARP_TMR_INTERVAL=30 -DCORE_POST_2_5_0 -DCORE_POST_2_6_0 -DNDEBUG -DICACHE_FLASH -DWEBSERVER_RULES_DEBUG=0 -DVTABLES_IN_FLASH -mtarget-align -Werror=unused-variable {compiler.minsize}
compiler.ar.extra_flags=
compiler.objcopy.eep.extra_flags=
compiler.elf2hex.extra_flags=
Board definitions
In Arduino IDE you must prepare the environment variables yourself.
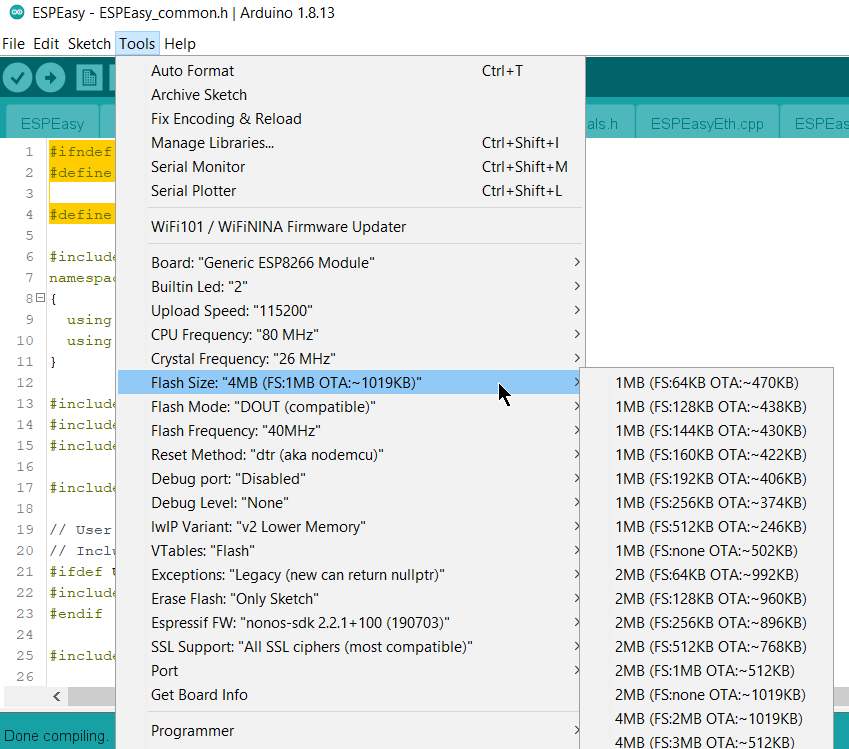
Board: “Generic ESP8266 Module”
Flash Size: Pick the one reflecting your board (4M flash 1M FS is the most used)
Flash Mode: “DOUT”
The other settings are likely to be correct when using the defaults. See the screenshot to be sure.