PlatformIO
ESP easy can be built using the PlatformIO/pioarduino IDE (PIO). Arduino IDE is no longer supported for development though it’s technically possible to be used. It may take considerable effort to get it setup for building ESPeasy.
We strongly advise to use PIO as build environment.
PIO is just the build, test and upload environment for many micro controllers like the ESP8266 and ESP32 we use.
On top of that you need to use an editor, or so called IDE in which PIO will be used.
The current choice is:
Microsoft Visual Studio Code. (MS VSCode)
VSCode is free to use and available for Windows, MacOS and Linux.
Apart from VSCode, there are more available, like Eclipse, MS Visual Studio (IDE) and probably more.
PlatformIO/pioarduino Prerequisites
PIO does need at least the following:
Python
Git command line tools (download)
For most operating systems, Python is already present, but for Windows you may need to install it. Starting October 2019, Python 3.x is supported in all build tools we use for ESPEasy.
Please follow these steps to install Pyton in Windows for PlatformIO.
Warning
Do not forget to check “Add Python xxx to PATH”.
These steps have been explained in this Youtube video: https://youtu.be/ArqwMcYSMsU though you might want to use the latest version of both the Git tools and Python.
PlatformIO/pioarduino with VSCode
Install
For development of ESPEasy, a number of extensions has to be installed in VS-Code:
pioarduino IDE (by pioarduino)
Select a C++ code completion plugin, either Microsoft C/C++ Intellisense or LLVM
clangdMicrosoft
C/C++ (by Microsoft)
LLVM
clangd (by LLVM)
C/C++ Extension Pack (by Microsoft)
C/C++ Themes (by Microsoft)
Uncrustify (by Zachary Flower, originally by Laurent Tréguier)
Optional, but highly recommended:
C/C++ DevTools (by Microsoft)
Bookmarks (by Alessandro Fragnani)
GitLens - Git supercharged (by Gitkraken)
TODO Highlight v2 (by Jonathan Clark)
All Autocomplete (by Atishay Jain)
Excel Viewer (by GrapeCity)
Esbonio - An extension for editing sphinx projects (by Swyddfa)
reStructuredText (by LeXtudio)
reStructuredText Syntax highlighting (by Trond Snekvik)
Extension pack for reStructuredText (by LeXtudio Inc.)
Markdown All in One (by Yu Zhang)
ESP Crash Decoder (by Jason2866)
WSL (by Microsoft) (when using WSL2 as documented below)
In VSCode 1.113 the default code color scheme has changed from Light Modern or Dark Modern to VS Code Light or VS Code Dark. For many users this change was quite unexpected as the used colors are quite different from the previous color scheme, so to revert to the previous default setting press Ctrl-K,Ctrl-T (Cmd-K,Cmd-T on MacOs) and choose the previous default light or dark theme, or choose a different setting from the available options.
Uncrustify
The extension Uncrustify is mainly to format the code using a standard code format definition. This code format standard is defined in the file uncrustify.cfg in the main directory of this repository. For new code contributions, it is highly appreciated if the code is formatted using this tool.
NB: Uncrustify has to be installed separately, as it is not included in the plugin! Download Uncrustify from Sourceforge.net
When using a Linux OS, f.e. WSL with Ubuntu, uncrustify can be installed via the regular package manager (shown below). It is strongly advised to use version 0.78 or newer, as older versions seem to have some bugs, causing document formatting to fail.
To do so:
Right click mouse in editor
“Format Document”
The first time (after installing uncrustify) it must be confirmed to use Uncrustify as formatter and using the default suggested config file.
After setting it as the default formatter, the hotkey Alt-Shift-F (Cmd-Shift-F on MacOS) can be used to format the entire document.
Note
There used to be a reference to the Atom editor, but both Atom, and the PlatformIO plugin for Atom, are no longer maintained by their owners, so it was removed from this documentation.
Load a project using PlatformIO/pioarduino
Note
PlatformIO has been superceded by the Community-supported pioarduino initiative. For simplicity, in most places the abbreviation PIO is throughout this section of the documentation.
If you have PIO installed and the source tree cloned to your hard drive, then you can open the main dir of the repository. The main directory of the repository is the level with the file platformio.ini in it.
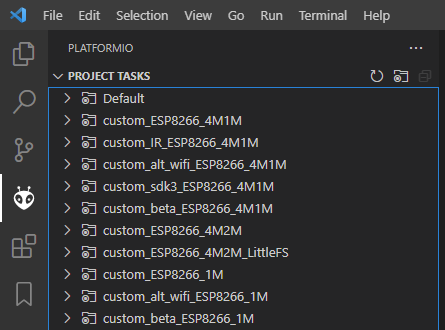
Then in a few moments after opening the directory, on the left there will appear an chip-package logo, the logo of pioarduino. If you click that one, you will get a tree with lots and lots of project tasks and environments.
It is important to note that PIO does everything based on environments, which are defined in the platformio.ini file. In the PIO menu (on the left) everything is grouped per environment.
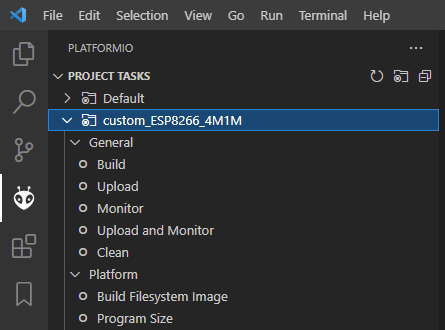
An environment entry has several tasks, like:
Build
Upload
Monitor
Upload and Monitor
Clean
… many more.
The environment definitions all have at least the used micro controller in the name and the amount of flash memory used.
For example:
…_ESP8266_4Mnn -> ESP8266 has external flash, which can vary in size from 512 kB to 16 MB, with nn configured as filesystem.
…_ESP8266_1M -> ESP8285 has the flash internal, which is almost always 1 MB. ESP8266 does have an external flash chip, which allows for exchanging it for a larger flash chip (recommended).
…_ESP32_4M316k -> ESP32 with 4 MB flash and a 1.8 MB partition for the sketch. (316k LittleFS)
…_ESP32s2_4M316k -> ESP32s2 with 4 MB flash and a 1.8 MB partition for the sketch. (316k LittleFS)
…_ESP32_16M8M -> ESP32 with 16 MB flash and a 4 MB partition for the sketch. (8MB LittleFS)
Make a Custom build using PIO
To create a build from the sources, first thing is to get the sources onto your computer. This can be done in several ways:
Clone the repository using git tools to your computer
Fork the repository to your own Github account, and clone this to your computer (advantage: You can make changes and create a pull-request to have that included in the ESPEasy code base)
Download a .zip file with the code from the Gihub page of ESPEasy https://github.com/letscontrolit/ESPEasy and unpack that
(NB: Using / as the path separator here, in Linux style, on Windows use \ in the cd commands instead)
Option 1.
Advantage: Quick to get started, easy update to the latest source.
Disadvantage: You can’t create a pull-request from this environment to add improvements to ESPEasy.
Initial setup:
Open a command prompt or terminal, and change the current directory to a folder where you have enough space to hold the code, libraries and tooling (ca. 2 GB)
cd /develop
git clone https://github.com/letscontrolit/ESPEasy.git
This will create a folder /develop/ESPEasy.
If you did the initial setup some time ago and want to update to latest source:
cd /develop/ESPEasy
git pull
Continue at General steps, below.
Option 2.
Advantage: Quick to get started, can update to the latest source, can contribute to ESPEasy.
Disadvantage: A little bit more complex to setup and update.
Initial setup:
Go to https://github.com/letscontrolit/ESPEasy, be sure to log into your Github account, and create a fork of the ESPEasy repository to your account (a more elaborate description can be found below)
Open a command prompt or terminal, and change the current directory to a folder where you have enough space to hold the code, libraries and tooling (ca. 2 GB)
cd /develop
git clone https://github.com/[your_github_handle]/ESPEasy.git
cd ESPEasy
git remote add upstream https://github.com/letscontrolit/ESPEasy
This will create a folder /develop/ESPEasy, and tell git where to synchronize to, ‘upstream’.
If you did the initial setup some time ago and want to update to latest source:
cd /develop/ESPEasy
git pull upstream mega
Continue at General steps, below.
Option 3.
Advantage: ? You don’t need to install the git tools.
Disadvantage: Source can not be easily updated with the latest code changes.
Initial setup:
Go to https://github.com/letscontrolit/ESPEasy and from the green Code button, select the Download ZIP option.
Create a folder /develop/ESPEasy
Expand the content of the downloaded .zip file into this folder, preserving the folder structure.
Update to latest source code:
Save your Custom.h and/or pre_custom*.py file(s), if you created or changed any of them for a Custom build.
Delete the content of the /develop/ESPEasy folder.
Re-do the Initial setup.
Copy back your Custom.h and/or pre_custom*.py file(s), if you saved them before.
Continue with the General steps.
General steps:
Then open this folder from VSCode. You can save this setup as a Workspace file, so you can switch between multiple Workspaces, or quickly return to the state of work since you last closed VSCode.
On the left side of the VSCode UI, there are a set of large buttons, and one of them is pioarduino (or PlatformIO if you installed that, though that’s no longer recommended), that when clicked shows the available Project Tasks (environments) that can be expanded.
The easiest is to go for the environment custom_ESP8266_4M1M and unfold that one.
Then select Build to see if it will start building.
If that’s working, you can open the file pre_custom_esp82xx.py and add or remove the plugins and controllers you need.
That Python file is used in the env:custom_ESP8266_4M1M (or any custom ESP8266 build environments) to define what should be included and what not.
For example to have only the controller C014, you can remove CONTROLLER_SET_ALL, and just add USES_C014,
The same for the plugins you need.
The file is built in the .pio/build/.... directory right under the main repository directory (the one with the platformio.ini in it)
Instead of modifying pre_custom_esp82xx.py (or any of the pre_custom_esp32*.py files for that matter), one can also copy src/Custom-sample.h to src/Custom.h and make the desired changed in this file. This file is excluded from git, so can be adjusted to your own requirements. When the Custom.h file is available (mind the uppercase C!), it will be used by the custom build scripts instead of the defaults set by pre_custom_esp82xx.py (or pre_custom_esp32*.py).
In the freshly copied Custom.h you will find all available plugins and features available in ESPEasy, and also you can enable or disable some settings to be used on a clean (empty flash) install.
Enabling a plugin or feature can be done by removing the comment marker (//) at the start of the line.
Note
Custom IR builds have their own pre_custom_esp82xx_IR.py or pre_custom_esp32_IR.py file.
All builds will be made in a directory with the same name as the environment used.
Once the build is successful, the .bin file(s) and .bin.gz file (where applicable) are copied to the build_output/bin folder.
VS-Code with WSL2
Building ESPEasy on Windows has become more and more tedious due to various issues:
Maximum path lengh limits
Maximum command line length limits
Extremely long build times
All these mainly apply to the latest ESP32-xx builds using ESP-IDF5.x.
On a beefy desktop PC, like an AMD Ryzen9 with 12 CPU cores, building a MAX build for ESP32-S3 takes about 10 - 15 minutes on Windows.
The same build when using WSL2 via VS-Code takes only 2 minutes to build.
When using VS-Code with WSL2, the VS-Code editor application runs on Windows, and, via the WSL plugin, communicates with a VS-Code server component on a Linux instance, running on WSL, that has the source code repository available, and where the build process is executed.
Installing WSL2
For installing WSL2 the following steps are needed. Assumption here is that the default Linux distribution for WSL is used, currently Ubuntu (24.04 LTS), using apt-get as the package manager. Other Linux distributions may use a different package manager, like dnf, zypper or yum, using somewhat different commands. Those commands are not documented here.
Install WSL2 - The Windows part
Open a Windows Command prompt, preferrably Powershell, with Administrator privileges (Press the Windows key and start typing
powershell, then select Run as administrator)Type the command
wsl --installand press <Enter>, this will start the installation procedure, ask for permissions via User Account Control where needed (that must be confirmed), and download and install what’s required.Once this part of the installation is complete, the computer must be restarted. This will install any additional Windows components that weren’t installed yet.
After logging in to Windows, the installation procedure will be further completed, and you will be asked to enter a username and password for your day-to-day Linux user. This password will be needed later, f.e. when starting the WSL Linux instance, so best practice is to store it in a password safe of some sort (or write it on a Post-It note and stick that under your keyboard ;-))
Install WSL2 - The Linux part
Now that Linux is installed, it’s strongly advised to get it up to date with the latest patches, similar to Windows Update. This should be repeated on a regular basis to keep your installation up to date:
sudo apt-get update
sudo apt-get upgrade
NB: The sudo command will ask for your current account password once, (and maybe later again after some time has passed). When asked for confirmation, confirm the installation of any needed updates, or add the -y parameter to the upgrade command to continue without questions.
Additionally some tools need to be installed so PIO can be properly installed later, and we can use the Uncrustify plugin in VS-Code to format the code nicely:
sudo apt-get install python3-venv python3-pip uncrustify
NB: When running an older release of Ubuntu, like 2022.04 LTS, then uncrustify needs to be install/updated manually with a newer version, as the distributed version isn’t working correctly. Or your Ubuntu install could be upgraded to 2024.04 (or newer) to correct this issue.
Once this is completed, you can get the ESPEasy code in your WSL Linux file system. By default your Linux instance has access to the same internet connection as the host-computer that’s running WSL, so the commands are the same as below for cloning a repository (Clone your forked repositoryto your computer)
Start VS-Code from Linux
Now that the repository is available locally, you can start VS-Code from the root folder of this repository:
cd ESPEasy
code .
This will install, or update, the VS-Code server component in Linux and then open the VS-Code IDE in your Windows environment, assuming you have installed the suggested WSL plugin in VS-Code.
Linking USB serial adapter to WSL2
In short, a specific USB device must first be shared (using usbipd bind --busid <busid> ) and thus made unavailable from Windows.
After the USB device is ‘bound’ (shared), it must be attached to a specific wsl instance.
N.B. this must be repeated after a device was unplugged and replugged.
The required steps are described here However since this is rather tedious and error prone, it is strongly advised to use a GUI tool like WSL USB Manager to perform these steps.
After attaching an USB device to a WSL instance, it is best to check whether it was found using dmesg via the command line on WSL2.
If only an USB device was detected but no /dev/ttyUSBxx was assigned, then a modprobe call is needed:
sudo modprobe usbserial- Probably needed for any USB to serial adaptersudo modprobe ch341- For CH340/CH341 USB to serial chips (rectangular form chip)sudo modprobe cp210x- For FTDI CP210x USB to serial chips (small square form factor)sudo modprobe ftdi_sio- For FTDI USB to serial chips with multiple serial ports like the FTDI4232H which has 4 serial ports.sudo modprobe vhci-hcd- For the virtual serial port passed from the Windows side to WSL2 (since WSL2 started using Linux 6.x core)
After calling these ‘modprobe’ commands, the result can be verified using lsmod and re-checking dmesg to see which /dev/ttyUSBxx ports were assigned.
The ownerchip and permissions of these /dev/ttyUSBxx are probably set like this:
ll /dev/ttyUSB0
crw------- 1 root root 188, 0 Oct 18 22:02 /dev/ttyUSB0
The simplest way to get this to work without constantly using sudo or run as root is to change permissions like this:
sudo chmod 666 /dev/ttyUSB0
ll /dev/ttyUSB0
crw-rw-rw- 1 root root 188, 0 Oct 18 22:02 /dev/ttyUSB0
Note
This is not the best way from a security point of view.
A probably more preferred method is to change ownership of the device to dialout group:
sudo adduser $(whoami) dialout
sudo chown root.dialout /dev/ttyUSB0
sudo chmod 660 /dev/ttyUSB0
ll /dev/ttyUSB0
crw-rw---- 1 root dialout 188, 0 Oct 18 22:14 /dev/ttyUSB0
Upload to ESP
Linux
For Linux, you may need to install 99-platformio-udev.rules to make PIO upload tools work in vscode.
Starter guide for (local) development on ESPEasy
For those with less development experience, or less experience in using Github, this chapter is intended as a How To guide to get started with development on ESPEasy.
It tries to help setting up Visual Studio Code (VSCode) with the PIO development environment and additional VSCode plugins that aid in easier working on code and documentation.
The global steps described here are:
Creating a private copy on Github
Getting VSCode and PIO set up
Getting the source code from Github onto your system
Compiling the source code
Creating a branch to make your changes
Modify the source code, compile & test
Add a plugin (optional), compile & test
Write documentation on the changes you made
Commit your code and create a pull request on Github to publish your changes to the world
Regular maintenance of your fork (housekeeping)
Advanced procedures:
Get a pull request by someone else on your system to create a local custom build
Let’s get started!
Github account
First requirement is to have a Github account. You can either use an existing account or create one (it’s free), by opening a browser on https://github.com, and following the steps after clicking the Sign up (for Github) button.
The Github flow
When you want to extend some function of the software at hand, ESPEasy in this case, there is a general flow, or ‘how things are done here’, that is common for Github, but most likely somewhat different from other software development flows or processes.
The usual Github flow or way of working is described nicely on this page: Understanding the GitHub flow If you have not used git or github before, or have little knowledge on how all this works, this explanation can be very helpful.
Fork the ESPEasy repository
ESPEasy uses the ‘Fork and Pull’ development method. This is probably the most used method for open source projects. This involves creating a copy (the fork) of the project, and request to incorporate changes into the original project by means of pull requests.
Reasons for forking Quote: “A fork is a copy of a repository. Forking a repository allows you to freely experiment with changes without affecting the original project.”
As an ‘external’ developer, no (direct) write-access is granted to the ESPEasy repository. To experiment with the code, and still be able to later have your development work included in the project, a ‘fork’ has to be made to your own account. So, log into your Github account from a webbrowser, browse to https://github.com/letscontrolit/ESPEasy and click the Fork button to create that copy:

After this completes, you can view the fork in your Github dashboard at https://github.com/[your_github_handle]
(You have to replace [your_github_handle] with the name you selected during the Github sign-up procedure)
Install VSCode and PIO
Earlier on this page, a complete description has been given on how to install PlatformIO/pioarduino with VSCode with the required and advised optional extensions and the git command-line tools.
NB: PlatformIO/pioarduino is shortened to PIO.
Clone your forked repository to your computer
To get the ESPEasy sources on your computer for compilation and making modifications, a ‘clone’ has to be made, using the git clone command
Cloning a repository Quote: “You can clone your repository to create a local copy on your computer and sync between the two locations.”
Note
If available, a clone can of course also be made using GUI tools like Github Desktop, GitKraken, SourceTree or TortoiseGIT, etc., but, as the git command-line tools have been installed as part of setting up the development environment, that is used in the steps here.
Open a Command prompt (Windows) or Terminal session (MacOS or Linux), and cd to a folder where the ESPEasy project can/should be a subfolder of.
Then type this command to create the clone:
git clone https://github.com/[your_github_handle]/ESPEasy.git
This will create a new folder called ESPEasy, and download all files that make up the project into that folder.
Working on it:

Completed:

To be able to get the latest changes from the original project into your local copy, and to bring your changes as a ‘pull request’ (git terminology, often referred to as a ‘PR’, further explained below) to the ESPEasy repository, a connection has to be made from your local clone to the ‘upstream’ source (git terminology, pointer to the repository the fork was taken from). This command needs to be issued only once after cloning the repository into a folder on your computer, and should be executed from the ESPEasy folder that was just created:
git remote add upstream https://github.com/letscontrolit/ESPEasy
Now this Command prompt / terminal (or GUI tool) can be closed.
Open the folder with ESPEasy project
Start VSCode, and open the ESPEasy folder that was just created. In Windows you can right-click the ESPEasy folder and select the ‘Open with Code’ option. First thing when opening a git repository, VSCode will ask you if you trust the authors of the files. The easiest option is to respond by clicking the ‘Yes, I trust the authors’ button, as that is the only way to get unrestricted access to the sources. After that confirmation, VSCode will take a little time to initialize all plugins.
Depending on your usual workflow, the current VSCode environment can be saved as a ‘Workspace’ (VSCode terminology), so it can be easily re-opened. This is especially useful if you also use VSCode for other projects/editing work.
Compile an ESPEasy PIO environment
ESPEasy supports several different configurations of ESP units, ESP8266, ESP8285 and ESP32, and also some predefined hardware configurations and sets of plugins & controllers. This has been turned into several different PIO environments, to make managing the different builds as easy as possible.
To compile such ‘environment’ (PIO terminology), select the PIO button (it looks like an alien) in VSCode:
Expand an environment from the list, so the PIO options become visible (this will take some time for PIO to scan the configuration of that environment).
Now, the Build option is visible, and clicking that will build the project for the selected environment (configuration).
The first build will take some extra time, as PIO needs to first install some of its tooling and other required components and libraries, but as you haven’t changed any files yet, the build should be successful:
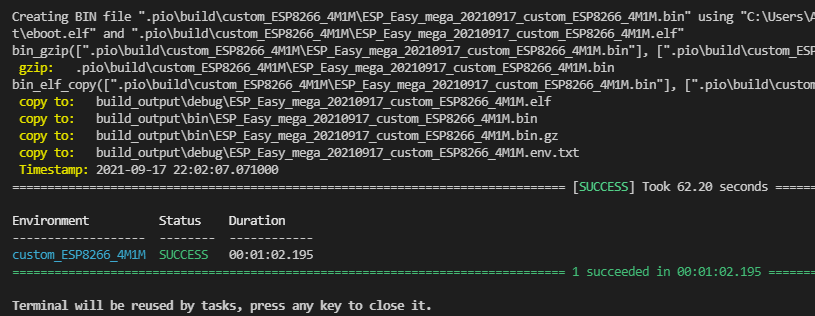
(NB: For this build all tools and libraries where already installed, and the computer isn’t that slow, so total execution didn’t take too much time.)
Create a new branch
As shown above, the git workflow starts by creating a new branch to do the development work in. This will record all changes to the sourcecode you make, and can be put in as a pull request (explained below) for ESPEasy.
A new branch is created by clicking on the ‘mega’ branch name (lower left in the status bar of VSCode) and selecting the option ‘Create new branch…’ from the list presented at the middle-top of the VSCode window. Then a new braanch name should be typed. Branch naming does use some conventions. New features are often named like ‘feature/purpose-of-the-feature’, and bugfixes are usually named like ‘bugfix/what-is-to-be-fixed’. For the addition of this documentation, I’ve created a branch named ‘feature/how-to-guide-for-new-developers’:
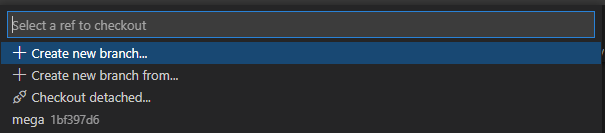


As an alternative, a new branch can also be created using command-line commands, you can type these after opening a Terminal in VSCode:
git checkout -b feature/how-to-guide-for-new-developers
The nett result of this command is the same as from using the UI flow shown above.
Change code of ESPEasy
To improve or extend an existing plugin or other code of ESPEasy, after creating a new branch for it, open the source file and modify code the as needed. Then compile and see if it all is according to the requirements of the compiler. Errors (showing as red text messages) will abort the compilation process, warnings, yellow messages, allow to continue, but should be resolved as much as possible before committing the code.
Testing is done by uploading the generated .bin file to an ESPEasy unit, testing the changed functionality to ensure no errors or undesired behavior remain in the code.
This uploading can be done in 2 ways:
Use the Upload feature of PIO: If the ESP unit is connected to the computer via USB and the serial chip of the unit is recognized by the OS, the Upload option can be selected to compile the sources (only what was changed since the last compilation) and start the upload procedure. After uploading the ESP will restart.
Use the Update Firmware option of ESPEasy: On the Tools tab of ESPEasy, there is a button Update Firmware available (on units that have enough free Flash space) so a new .bin file can be uploaded. The latest successful compiled file can be found in the
build_output/binsubfolder of yourESPEasyfolder.
Add a plugin to ESPEasy
Instead of just changing an existing plugin or some other feature of ESPEasy, also, new plugins can be added. Plugins can be created from scratch, starting with the template _Pxxx_PluginTemplate.ino that includes instructions what each section is supposed to do, take a proposed plugin from the ESPEasyPlayground repository at https://github.com/letscontrolit/ESPEasyPluginPlayground, or from other sources (some plugins are in personal Github repositories, but never submitted to the ESPEasyPluginPlayground).
It requires sufficient testing, and analysis of the runtime behavior, of that piece of code, before it should be submitted for a pull request.
When creating a new plugin, a request for an available plugin ID should be posted in this support issue: [Plugins] List of planned new plugins (request a Plugin-ID here)
Especially for new plugins, it is highly recommended to write documentation, as explained in paragraph Writing documentation, below.
Using external libraries
Note
Since November 2022, the PIO configuration for ESPEasy was changed to require all libraries to be locally available, to a) prevent unexpected ‘surprises’ when an external library is updated, and b) greatly improve build output stability and quality.
While developing a plugin or some other feature, often you use an existing library to re-use that (assumably) proven and tested functionality. To include such library, there is a prerequisite, and some generic steps to take:
Prerequisite:
The library should have a valid
library.jsonorlibrary.propertiesfile (both is also fine).
Procedure:
Create a new folder in the
libsubfolder of this repository, and give that the name of the library.Copy all files, preferrably excluding the
.gitfolder that is created when cloning a git repository, into the new folder.In your source, reference the library by using
#include <main_h_file.h>, where the<>should stay, andmain_h_file.hshould be replaced by the needed .h file for the library. Multiple .h files can of course be included, as needed for using the required features.Include all files of the library in the (first) pull request for your changes, so the Github Actions build can also use it.
Writing documentation
Updating, or adding if it does not yet exist, the documentation is a useful activity that should be part of changing or adding to the ESPEasy code. Some of the optional VSCode extensions are specifically aimed at that task.
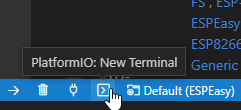
The documentation is created in the reStructuredText format, using mostly a .rst extension, and can be built locally by installing the sphinx tool. This can be installed manually by opening a PIO Terminal window in VSCode (an already open PIO Terminal can also be used, when using WSL2 a PIO Terminal is required to execute in the correct Python Virtual Environment (venv)) and issuing these commands:
cd docs
pip install -r requirements.txt
The python tool pip will read the file requirements.txt and install all tools mentioned in the file. Depending on what is already installed, more or less of the modules will be installed. This should be a 1-time process, though sometimes updates to the tooling are made, and re-running these commands will then update all to the latest, possibly required, version.
The sources for the documentation are in the repository in the docs folder and its subfolders.
When adding screenshots it is advised to use the .png file format, as that usually has the best visible result for screenshots. When adding photos, the .jpg file format will do nicely.
Documentation for writing in reStructuredtext format can be found on the Sphinx website
Building the documentation into html files, for reviewing locally, can be done by running this command from the docs folder:
Start a new PIO Terminal:
cd docs
On Windows:
.\make.bat html
On Linux or MacOS:
make html
The resulting output can be found in this folder with the ESPEasy folder: docs/build/html and can be viewed by opening the file index.html in a browser. Then the normal navigation within the documentation is available.
TODO: Add documentation about the (file) structure of the documentation.
Commit and create a pull request
After changing and testing your changed source code, using builds uploaded to an actual ESP unit, the time has come to present the changed code to ESPEasy to be included in the regular build. This is called a ‘pull request’, and is explained in this Github documentation About pull requests Quote: “Pull requests let you tell others about changes you’ve pushed to a branch in a repository on GitHub.”
To make changes available for others they have to be ‘staged’ and ‘committed’ (git terminology) before it can be uploaded (pushed) to the repository. This stage and commit is a 2 step process, and easiest done from the VSCode UI. First select the GitLens plugin, and select the files that need to be staged and committed:
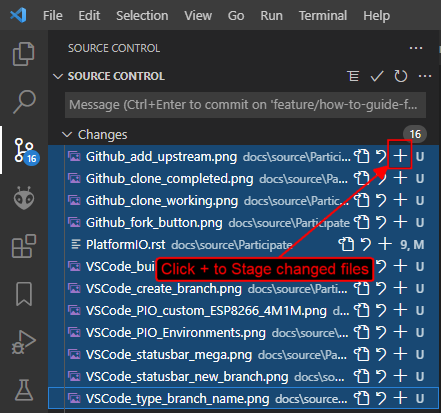
Selecting multiple files and clicking one of the + buttons next to the selected files, will put the files in the staging area, so they can be committed. Every commit will need a useful commit message, that describes what the commit is all about:
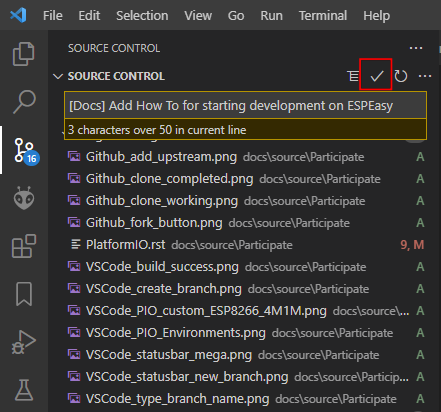
Clicking the marked check button, or using the Ctrl-Enter key combination, will commit the staged files, using the commit message just typed.
After the commit is completed, more commits can be added, if desired. It is good practice to commit separate functional changes in separate commits. That will make the review process, as explained in the Github flow documentation, easier.
To have the commit(s) to be presented as a pull request, they must be published, and the easiest way to accomplish that is to use the Publish Changes button in VSCode:

After clicking that button, you have to select the source the changes should be published to. As we don’t have (direct) write access to the upstream ESPEasy repository, we can only publish to the ‘origin’ (git terminology), our own fork of the repository, so that option should be selected by clicking it, or pressing the Enter key:

If this is the first time you try to push any changes to your repository, VSCode, or actually the GitLens plugin, will ask for your Github credentials, and will switch back and forth a few times between your webbrowser and VSCode to complete the authentication process. This is as intended.
Now that the Publish Changes is done, the pull request can be created. We have to switch to the ESPEasy repository on Github to complete that task. The Github website will show the options for that, assuming you are still logged in to your Github account from that browser:
When opening the https://github.com/letscontrolit/ESPEasy page (or refreshing it if it was already open), a message is shown that you have committed something to your forked repository, that can be pull-requested into the ESPEasy repository:

After clicking the ‘Compare and pull request’ button, a description for the PR can be given, the title can be updated, and the pull request created. Helpful information can be found in Creating a pull request from a fork
If needed, or requested during the review process, more changes can be made to files, or files added or deleted, then staged and committed, after which these can be pushed to Github, and the changes will be automatically added to the PR.
Regular maintenance of your fork
If you have forked ESPEasy before (or some time ago), and want to start (new) work on the code, it is required to update your fork with the latest state of affairs of ESPEasy, to avoid surprises, or difficulties when trying to merge, after submitting a PR.
This expects the currently selected ‘branch’ to be mega, as is visible in the VSCode statusbar:
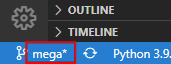
The desired branch can be selected by clicking the currently selected branch name as shown in the VSCode status bar, or by typing this command from a VSCode terminal window:
git checkout mega
The update is ‘pulled’ (git terminology) by getting the latest from the upstream source (we defined that source after the initial clone), by opening a terminal window in VSCode and issuing this command:
git pull upstream mega
(NB: The current development branch of ESPEasy is called mega where other Github repos often use master, or main. ESPEasy does have a master branch, but it currently isn’t actively maintained. The name of the ‘main’ branch of any repository can be chosen freely, the master or main name is just used by convention.)
Depending on the time passed since the last update and the changes made, some files will be updated from the git pull command.
To update your fork on Github, these changes should be ‘pushed’ (git terminology) to your fork by using the command:
git push
If this is the first time you try to push any changes to your repository, VSCode, or actually the GitLens plugin, will ask for your Github credentials, and will switch back and forth a few times between your webbrowser and VSCode to complete the authentication process. This is as intended.
Updating your fork this way should be done at least every time before you start new work, and can be done more often if desired. If kept up to date you will avoid starting with an out-dated state of the repository.
Get a pull request by someone else on your system
For those that want to test the code from a pull request, created by someone else, these commands can be used to get that code local:
Update your local repository to the latest git status on the server:
git checkout mega

git pull upstream mega

git push
Create a local branch to avoid cluttering your regular
megabranch: (I’ve deliberately used pluralpullsas a local folder to distinguish from the remotepullfolder on Github)
Note
For <prnumber> the pull request number (digits only, not including the # prefix!), as visible on the Github Pull requests tab of the letscontrolit/ESPEasy repository should be used.
git checkout -b pulls/<prnumber>
Download (fetch) the latest code (head) from the pull request on github into your local git repository
git fetch upstream pull/<prnumber>/head
Apply (pull) the latest fetched code (head) to the current branch (
pulls/<prnumber>)
git pull upstream pull/<prnumber>/head
Build the desired PIO environment, or add the (new?) plugin to your Custom.h file to create your local Custom build. Like described above, you can also add a plugin to the
pre_custom_esp82xx.pyorpre_custom_esp32*.pyPython scripts (when not having a Custom.h file, as that will be used for any Custom build first).To update your local code after the PR has been updated on github, repeat step 3. and 4. within the branch created in step 2. active (
git checkout pulls/<prnumber>).
Warning
This method does not enable or allow to contribute to that PR, that requires a different, somewhat more complicated, procedure, not documented here though available in the Github documentation.