Hardware - Ventus W266
The weather station Ventus W266 is a indoor + outdoor unit which can detect many weather related values.
Plugin details
Type: Hardware
Name: Ventus W266
Status ESP32: COLLECTION
Status ESP8266: COLLECTION
GitHub: P046_VentusW266.ino
Maintainer: .
Used libraries: .
Supported hardware
Ventus W266
Introduction
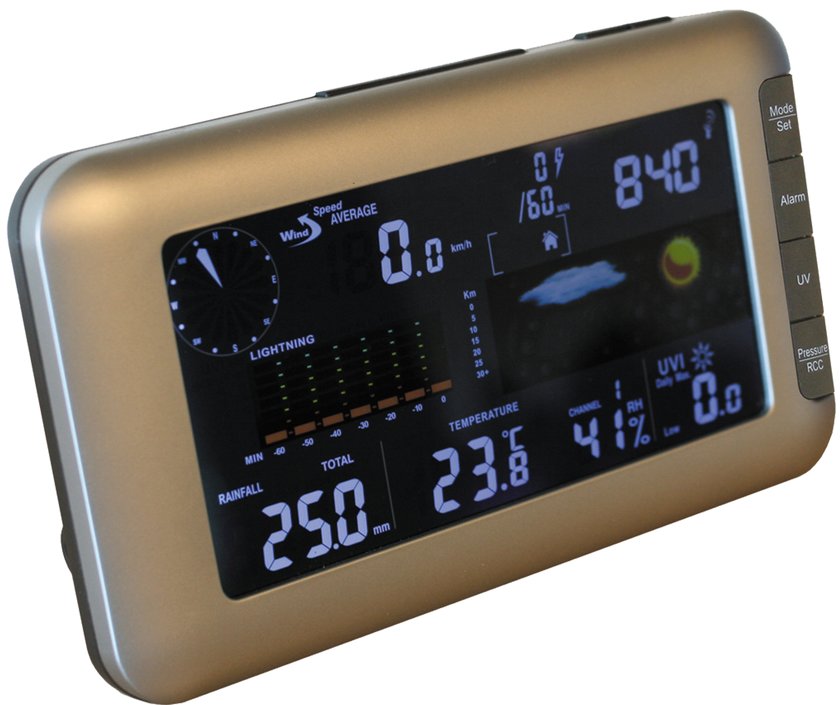
The Plugin for the Ventus W266 is used to connect a Ventus W266 weather station to ESPEasy universe. The Ventus W266 weather station is also sold under the name of RenkForce W205GU.
The weather station is delivered with 2 units and a power supply. The outdoor sensor unit is battery powered by 4 AA type batteries. It is recommended to use lithium type batteries so the power is stable during the freezing winters.
- Specifications (outdoor unit):
Outdoor temperature
Outdoor humidity
Wind direction
Average wind speed
Gust wind speed
Cumulative rainfall
UV index
Cumulative number of lightning strikes
Distance of the nearest lightning strike
- Specifications (indoor unit):
Indoor temperature
Indoor humidity
Barometric pressure
DCF77 clock
Note
Be aware that this plugin is not build by default because it is disabled.
The plugin uses quite a lot of resources like ram and iram. Since the hardware used
is also something special we, the author and datux, decided to keep the plugin out
of the normal builds. Since then, ESPEasy has defined a special hard_Ventus_W266_1M build that
can be installed on any ESP board with at least 1MB Flash that has enough available GPIO pins (so not on an ESP01).
Also, the plugin can be added to a Custom build by following the instructions in PlatformIO.
The plugin can only read the sensors of the outdoor unit.
Danger
CONNECTING THIS PLUGIN WILL VOID THE WARRANTY OF YOUR WEATHER STATION!
If you are not yet prepared to void the warranty have a look at P190_Ventus_W266_RFM69.ino in the playground. The RFM69HCW unit is able to communicate with the outdoor unit using radio, thus you aren’t forced to do any tinkering with the indoor unit.
This device plugin is multi functional and you’ll want to install multiple instances (add the plugin multiple times) of this plugin to get all the different sensor readings. The outdoor unit has up to 9 sensors values and a minimum of 5 sensor types. Most home controllers, like Domoticz, can read multiple values per sensor type. The temperature sensor for instance also reads the humidity and the wind sensor combines two types of windspeed and the direction. You’ll need one instance per sensor type.
The plugin was originally written for use with (and tested on) Domoticz, which did not support custom multi value sensors at the moment (February 2017). This means the lightning detection is send as two instances. In total you could run as many as nine instances of the plugin to get all values.
Wiring
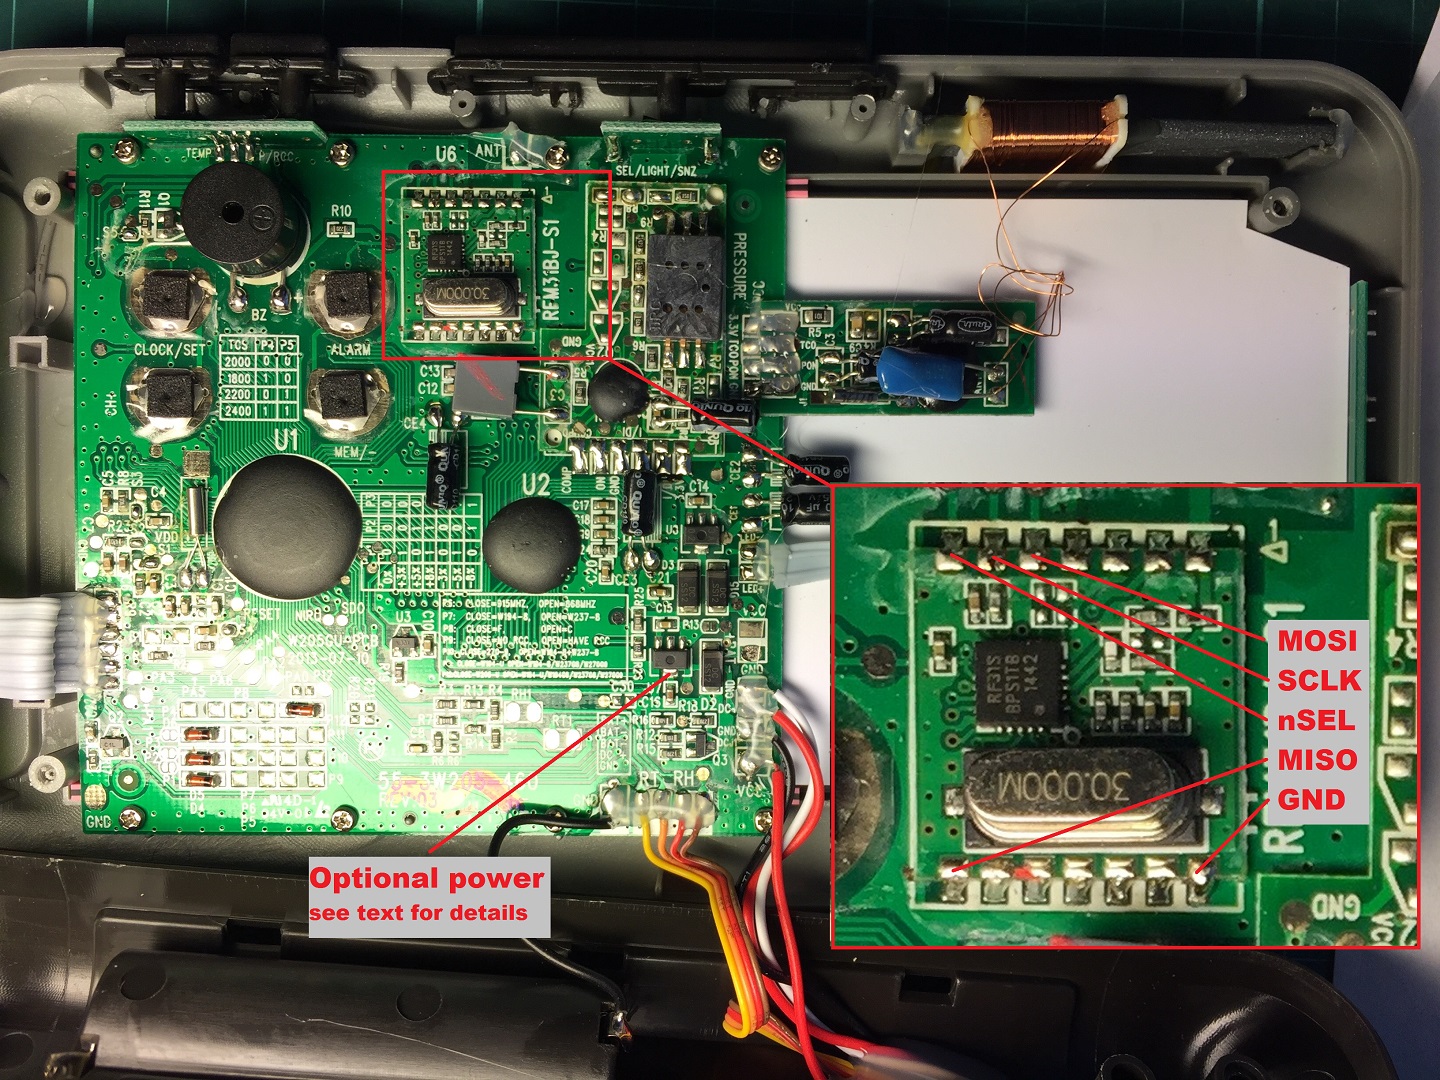
ESP               Ventus
GPIO (4)   <-->   MOSI
GPIO (12)  <-->   SCLK
GPIO (14)  <-->   nSEL
GPIO (5)   <-->   MISO

Power
5.0V       <-->   VCC (read note below)
GND        <-->   GND
Set up the piggy back ESP unit according to this schematics. We recommend you using a Wemos D1 mini board since these fit nicely.
Note
If your ESP module has it’s own 3v3 regulator you could connect its power input to the optional power pin specified in the image. The supplied power supply however is not powerful enough to supply both the display with the backlight on and an ESP while transmitting. It is safe to exchange the power supply for a USB power supply of 1A (or higher). The display unit is happy and working fine with only the 5 volts. Some adapters supply more then 5 volts, since the original adapter supplied 6 volts this should not be a problem.
Be mindful when you install the ESP unit. Although the space on the right, above the white display, seems to be perfect for placing the ESP, it is very close to the indoor temperature sensor and your readings on the display will be off by approx. +2 degrees because of the heat generated by the ESP. A better position is all the way on the left where a bare ESP-12E fits perfect, just be sure to supply it with 3.3V instead of the 5V from the supply pin in the picture.
When using a bare ESP be sure to apply the necessary ~10K pull-up resistors to CH_PD (CD_EN), GPIO0 and a pull-down to GPIO15 for stable performance and OTA capabilities.
Note
It is not possible to read the indoor sensors using the plugin nor is it in development or planned.
Setup
Task settings
Note
To get started you need to add the device plugin and set the instance to Main + Temp/Hygro. This instance contains the core functionality of the plugin and is needed to read the data send by the outdoor sensor unit. This instance is the only one that has the ability to set the GPIO pins used.
Device: Name of plugin
Name: Name of the task (example name VentusW266)
Enable: Should the task be enabled or not
Sensor
Plugin function: Main, Wind, Rain etc…
1st GPIO (5-MOSI): GPIO 4 (D2).
2nd GPIO (6-SCLK): GPIO 12 (D6).
3rd GPIO (7-nSEL): GPIO 14 (D5).
4th GPIO (8-MISO): GPIO 5 (D1).
Warning
You must not have more than 1 main plugin function active! It will not work properly if you have more.
Data Acquisition
This group of settings are standard available configuration items.
Single event with all values: When this setting is enabled, all available values will be sent in a single event
<TaskName>#All, with all values in order as arguments to the event.Show derived values: When checked, the Devices overview page, and the
/jsonendpoint (used for updating the Devices overview page) will include any Derived values as defined. See theTaskValueSetDerivedandTaskValueSetPresentationcommands.Event & Log derived values: When checked, the Derived values will be generated as Events, to be handled in Rules, and sent to logging devices like the Syslog server and/or SD-card logging.
(The derived values options are only available if String variables feature is included in the build.)
Send to Controller: Select the Controller(s) to send the Values to, either on a
TaskRuncommand applied to the task, or on an Interval time action.
Send to Controller is only visible when one or more Controllers are configured.
Depending on the controller capabilities, some configuration settings may be shown:

All configured Controllers are shown here, including the enabled or disabled state (multiple Controllers can be enabled, only a single MQTT Controller can be enabled at one time!).
For each controller the user can select wether the data should be sent on each Interval (or explicit TaskRun).
For the Domoticz controllers the value index (IDX) has to be configured.
For some controllers, like Home Assistant/openHAB, there are extra options available.
Group: This represents the group id to combine all values from multiple tasks into a single grouped-device during MQTT AutoDiscovery. Groups, by design, can span multiple ESPEasy devices, if desired, as long as the Task/Valuename combinations are unique. If a group should only combine Tasks from a single ESPEasy unit, the group id should be unique across multiple ESPEasy units. The group description, default Group <n>, can be adjusted in Home Assistant. If the Group value matches the current Unit nr, the Unit name,
%sysname%, is used instead of Group <nr>.Retained: For MQTT Controllers, this setting can be enabled to send the values for the current task with the Retain flag set. The Publish Retain flag in the Controller settings will override this by sending all task values with Retain flag enabled.
Send derived: This checkbox determines if any configured Derived values should also be sent to the controller (and included in the AutoDiscovery if that’s available and enabled).
Resend MQTT Discovery: When checked, will start a resend of the MQTT Discovery process for this task after a random delay, when Submit is clicked, so any changed settings will be updated in the MQTT broker. This setting is only available if the controller is enabled, the Auto Discovery feature is available and enabled for the controller. This setting is not stored.
Other controllers, like f.e. FHEM HTTP, do not support additional settings besides the checkbox to enable sending the data.
Interval: How often should the task publish its value (5..15 seconds is normal).
Indicators (recommended settings)
Warning
Although the “main” instance shows three values, only two will be send to the plugin as specified in the additional explanation. Only the main plugin instance has the ability to read the display unit. You need one, and only one, main instance. All other instances read the data fetched by the main plugin.
Indicator |
Value Name |
Interval |
Decimals |
Extra information |
|---|---|---|---|---|
Temperature |
Celsius |
60 |
1 |
Main + Temp/Hygro: Gives the temperature with 1 decimal precision in degrees Celsius and the humidity in percent. |
Humidity |
RH |
60 |
0 |
Main + Temp/Hygro |
Bearing |
Bearing |
60 |
0 |
Wind: Gives the wind direction in degrees, the average and gust wind speeds in m/s times 10. |
Average wind speed |
WindSpeed |
60 |
1 |
Wind |
Gust wind speed |
GustSpeed |
60 |
1 |
Wind |
Rain per hour |
RainHour |
600 |
0 |
Rain: Gives the rain per mm per hour and the total rainfall (which will eventually roll over or reset if the batteries are changed). |
Rain total |
GustSpeed |
600 |
0 |
Rain |
UV index |
UV |
60 |
1 |
UV: Gives the UV index with 1 decimal precision. |
Strikes per hour |
Strikes |
300 |
0 |
Lightning strikes: Gives the number of lightning strikes per hour during the last 5 minutes. |
Lightning distance |
StrikeDistance |
60 |
0 |
Lightning distance: Gives the distance to the closest lightning strike (stormfront). When no lightning is detected the value is |
Note
Unknown 1, byte 6 - This value is partly unknown and observed to usually be 00. Turns to 01 when the battery of the outdoor unit is low.
Unknown 2, byte 16 - This value is unknown but observed to always be 00.
Unknown 3, byte 19 - This value is unknown but observed to always be 38 (decimal).
Rules examples
on VentusW266#UV do
 if [VentusW266#UV]>9
   Publish,%sysname%/Alarm,Stay inside today!
 endif
endon
Where to buy
Store |
Link |
|---|---|
Conrad |
$ = affiliate links which will give us some money to keep this project running, thank you for using those.
Change log
Changed in version 2.0: …
added Major overhaul for 2.0 release.
Added in version 1.0: …
added Initial release version.