Display - ThermoOLED
.
Plugin details
Type: UV
Name: ThermoOLED
Status ESP32: DISPLAY
Status ESP8266: .
GitHub: P109_ThermoOLED.ino
Maintainer: TD-er
Used libraries: .
Description
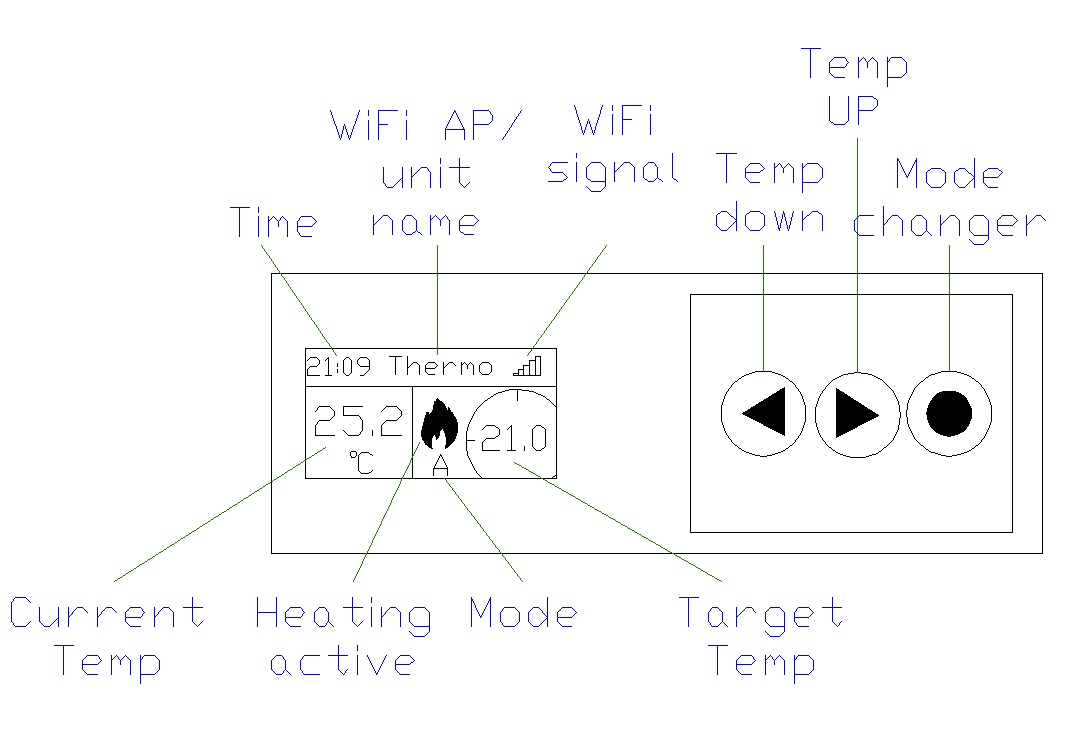
This plugin is a thermostat control for an on/off heating system.
Display and Button layout explanation:
Configuration
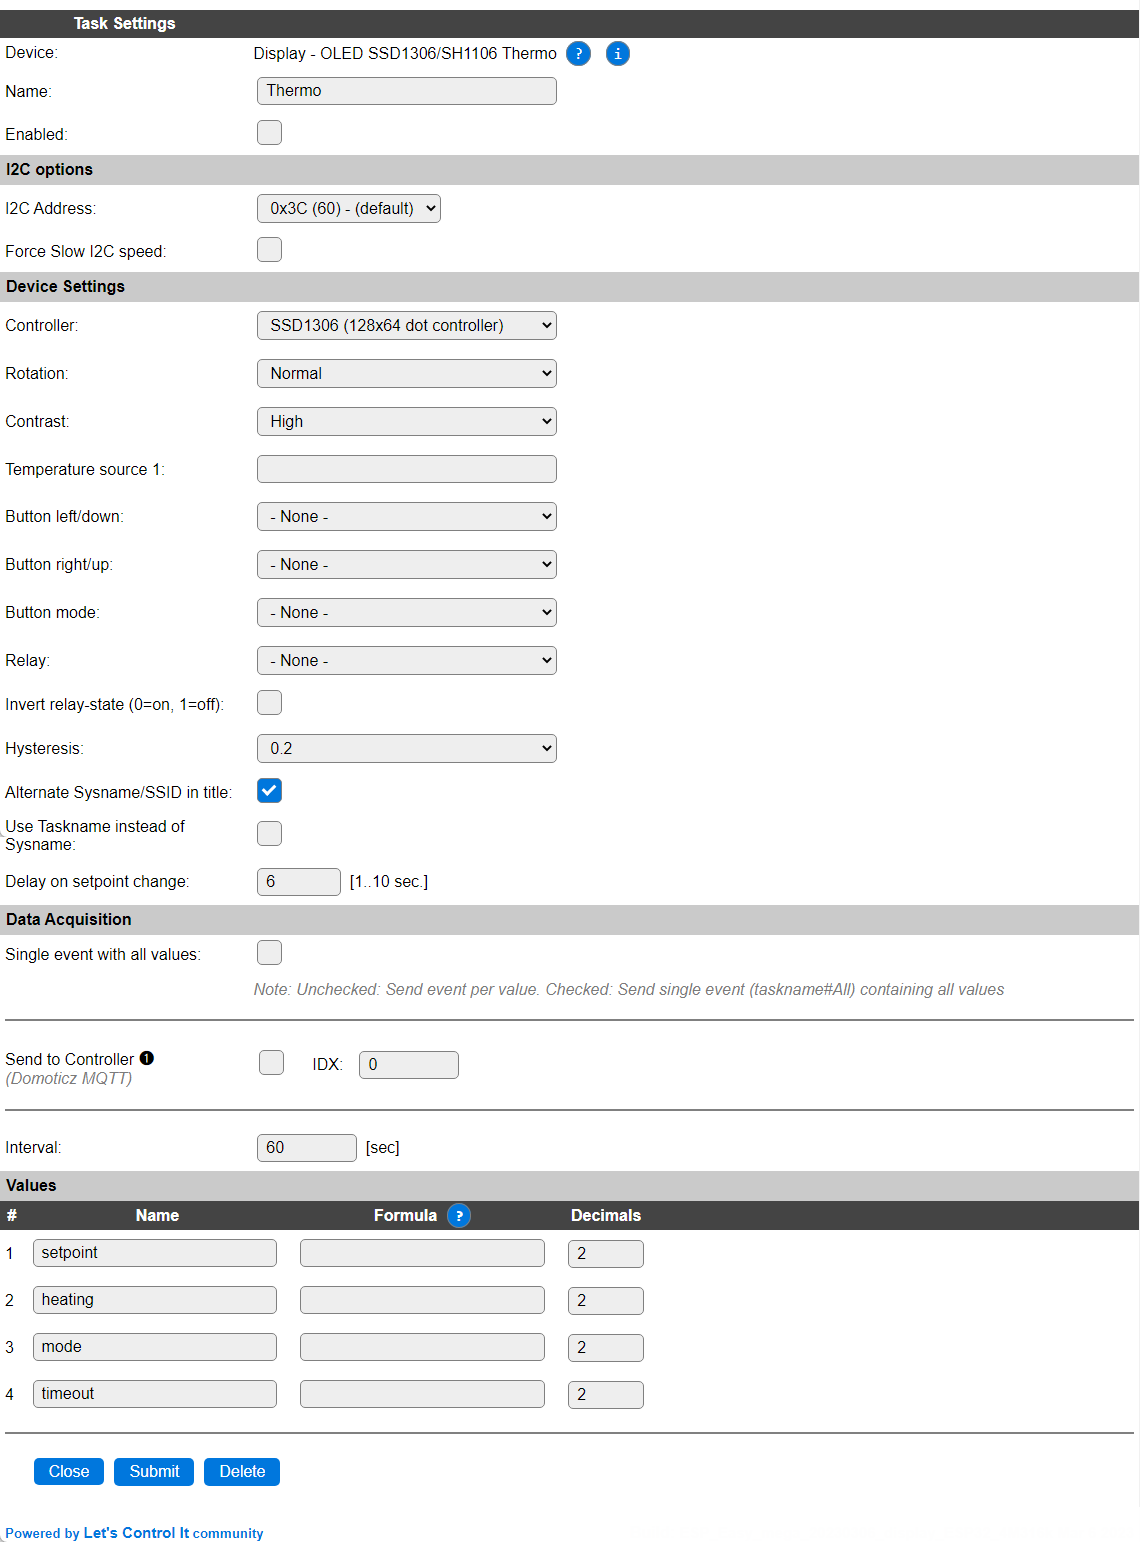
Task settings
Name: The name of the task. This should be unique for all devices that are configured. (Initially empty)
Enabled: For the device to work it has to be enabled. When checked, the device will be started as soon as the ESP starts. If desired, the device can also be enabled from f.e. a rule by using the
TaskEnable,<tasknr>orTaskEnable,<taskname>command, or disabled using the correspondingTaskDisable,<tasknr>|<taskname>commands.
I2C Options
The available settings here depend on the build used. At least the Force Slow I2C speed option is available, but selections for the I2C Multiplexer can also be shown. For details see the I2C Bus page
I2C Address: The address the device is using. Some boards offer a solderable address selector that is to be used to select the address. The available addresses are 0x3C and 0x3D.
Device Settings
Controller: Select the used controller, only the
SSD1306andSH1106are supported. This plugin requires a 128x64 or 132x64 pixel display.

Rotation: Depending on the way the display is mounted, it may be needed to rotate the content of the screen 180 degrees. That can be selected here.

Contrast: The brightness of the screen can be controlled by adjusting the contrast. For normal use, and to avoid the displayed content to burn-in on the display, Medium or Low should best be selected.

Temperature source 1: This is the temperature source for the thermostat. A
[task#value]name should be typed in here for a temperature task that reflects the temperature to be maintained by the thermostat.Button left/down: Select the GPIO pin that is used to connect the button to lower the setpoint temperature. When Manual mode is active, this button will decrease the Timeout value by 5 minutes. Maximum timeout value is 90 minutes.
Button right/up: Select the GPIO pin that is used to connect the button to raise the setpoint temperature. When Manual mode is active, this button will increase the Timeout value by 5 minutes. Maximum timeout value is 90 minutes.
Button mode: Select the GPIO pin that is used to connect the button to select the thermostat mode. When pressing the button the mode will rotate through the available modes. Available modes:
0: Off
1: Automatic, the default mode at startup.
2: Manual. When switched to manual, a timeout of 5 minutes is set, after which the mode is switched back to automatic. The user selected timeout duration in minutes can be set using the
thermo,mode,m,<timeout>command. Also, the timeout can be changed using the up and down buttons to increase or decrease the timeout in 5 minute steps.
Relay: Select the GPIO pin that will turn the relay on and off that controls the heat-source. Default: 1 = on, 0 = off, unless Invert relay is checked.
Invert relay-state (0=on, 1=off): Invert the working of the Relay pin, 0 = on, 1 = off.
Hysteresis: Select the temperature difference for switching the relay between on and off state, 0.2, 0.5 or 1 degree.

Alternate Sysname/SSID in title: When enabled, the title will be interchanged between the Sysname (Name of the unit, set on the Config tab), and the WiFi SSID the unit is connected to. When disabled, the Sysname (or Taskname, see next option) will be shown only.
Use Taskname instead of Sysname: When checked, the taskname will be used instead of the Sysname, to allow switching between tasks with different configuration, f.e. for having Day and Night configurations with different setpoints. The display then shows the active taskname.
Delay on setpoint change: Configure the delay in seconds before the relay state will be changed after the setpoint is changed. Range: 1..10 seconds. This is to avoid flipping the heating on/off rapidly when changing the setpoint value.
Data Acquisition
This group of settings are standard available configuration items.
Single event with all values: When this setting is enabled, all available values will be sent in a single event
<TaskName>#All, with all values in order as arguments to the event.Show derived values: When checked, the Devices overview page, and the
/jsonendpoint (used for updating the Devices overview page) will include any Derived values as defined. See theTaskValueSetDerivedandTaskValueSetPresentationcommands.Event & Log derived values: When checked, the Derived values will be generated as Events, to be handled in Rules, and sent to logging devices like the Syslog server and/or SD-card logging.
(The derived values options are only available if String variables feature is included in the build.)
Send to Controller: Select the Controller(s) to send the Values to, either on a
TaskRuncommand applied to the task, or on an Interval time action.
Send to Controller is only visible when one or more Controllers are configured.
Depending on the controller capabilities, some configuration settings may be shown:

All configured Controllers are shown here, including the enabled or disabled state (multiple Controllers can be enabled, only a single MQTT Controller can be enabled at one time!).
For each controller the user can select wether the data should be sent on each Interval (or explicit TaskRun).
For the Domoticz controllers the value index (IDX) has to be configured.
For some controllers, like Home Assistant/openHAB, there are extra options available.
Group: This represents the group id to combine all values from multiple tasks into a single grouped-device during MQTT AutoDiscovery. Groups, by design, can span multiple ESPEasy devices, if desired, as long as the Task/Valuename combinations are unique. If a group should only combine Tasks from a single ESPEasy unit, the group id should be unique across multiple ESPEasy units. The group description, default Group <n>, can be adjusted in Home Assistant. If the Group value matches the current Unit nr, the Unit name,
%sysname%, is used instead of Group <nr>.Retained: For MQTT Controllers, this setting can be enabled to send the values for the current task with the Retain flag set. The Publish Retain flag in the Controller settings will override this by sending all task values with Retain flag enabled.
Send derived: This checkbox determines if any configured Derived values should also be sent to the controller (and included in the AutoDiscovery if that’s available and enabled).
Resend MQTT Discovery: When checked, will start a resend of the MQTT Discovery process for this task after a random delay, when Submit is clicked, so any changed settings will be updated in the MQTT broker. This setting is only available if the controller is enabled, the Auto Discovery feature is available and enabled for the controller. This setting is not stored.
Other controllers, like f.e. FHEM HTTP, do not support additional settings besides the checkbox to enable sending the data.
Values
There are 4 values available for this plugin, that reflect the current status while the task is active.
Setpoint shows the currently used setpoint temperature.
Heating shows either 1 or 0 for heating On or Off.
Mode shows the mode, 0 = off, 1 = automatic, 2 = manual.
Timeout shows the remaining timeout while in Manual mode. When not in Manual mode, the value is undefined.
Commands
Command Syntax |
Extra information |
|---|---|
Sub:
|
OLED displays will age quite fast, so it is not adviced to run them continously at max brightness. Some displays do not accept all brightness levels and some also make a quite high pitch coil whine noise when running on some brightness levels. So different levels of brightness can also be of help on those displays. This command is shared with Display - OLED SSD1306/SH1106 Framed, so when having both plugins enabled, the command has to be prefixed with the taskname and a periode, like |
|
Set the setpoint value, that the thermostat feature will try to maintain. |
|
Change the setpoint value down by 0.5 degrees, simulating a keypress on the Down button. This enables an alternative way to control the setpoint. If Manual mode is active, the timeout will be decreased by 5 minutes. |
|
Change the setpoint value up by 0.5 degrees, simulating a keypress on the Up button. This enables an alternative way to control the setpoint. If Manual mode is active, the timeout will be increased by 5 minutes. |
|
Change the mode to the next circular value in the 1, 2, 0 range, simulating a keypress on the Mode button. This enables an alternative way to control the thermostat mode. When Manual mode is selected, the timeout is by default set to 5 minutes, and after the timeout it returns to automatic mode. |
State:
Any other value: Turn off the heating. |
Set on the heating manually, either to |
Mode:
Timeout: A timeout for Manual mode in minutes. When no timeout is provided it will return to Automatic mode nearly immediately (~1 second). |
Set the thermostat mode. |
Change log
Changed in version 2.0: …
changed 2022-10: Behavior change, change relay state only after a configurable delay, only save settings when changed and after a delay of 30 seconds
added 2020-04-25