Communication - Itho
Itho RFT fan control using a CC1101 transceiver
Plugin details
Type: Communication
Name: Itho
Status ESP32: COLLECTION F CLIMATE
Status ESP8266: COLLECTION F CLIMATE
GitHub: _P118_Itho.ino
Maintainer: svollebregt
Used libraries: https://github.com/arjenhiemstra/IthoEcoFanRFT/tree/master/Master (currently using a local adapted version of v2.0.0, due to v2.1.0 recieve issues i.c.w. plugin)
Description
This plugin enables communication with an Itho RFT fan (and some Duco fans) through a CC1101 868 MHz transceiver. It allows controlling the fan speed by simulating an Itho remote, and can also monitor for commands sent by other remotes.
Wiring
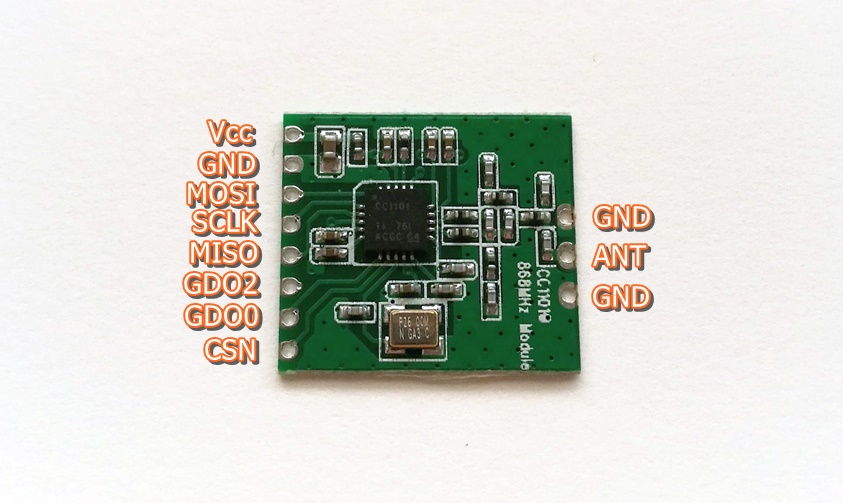
The CC1101 transceiver is controlled via SPI and also requires an pin for the interrupt to let the ESP know a data packet has arrived. Make sure to enable SPI under the ESPEasy hardware configuration.
CC1101 pin                    ESP pin                 Description
1 - Vcc                       Vcc                     3.3V
2 - GND                       GND                     Ground
3 - MOSI      <--             D7/GPIO13               Data input to CC1101
4 - SCK       <--             D5/GPIO14               SPI clock pin
5 - MISO      -->             D6/GPIO12               Data output from CC1101
6 - GDO2      -->             Choose                  Interrupt pin (see note)
7 - GDO0                      NC                      Not in use
8 - CSN       <--             D8/GPIO15               SPI chip select
Note
Any pin of the ESP can be used except for SPI pins, boot related pints (GPIO0, GPIO2, GPIO15), or GPIO16 (no interrupt support). If you use I2C pins for the interrupt make sure to disable I2C in the ESPEasy hardware configuration.
Configuration
Name Required by ESPEasy, must be unique among the list of available devices/tasks. Used in MQTT commands
Enabled The device can be disabled or enabled. When not enabled the device should not use any resources.
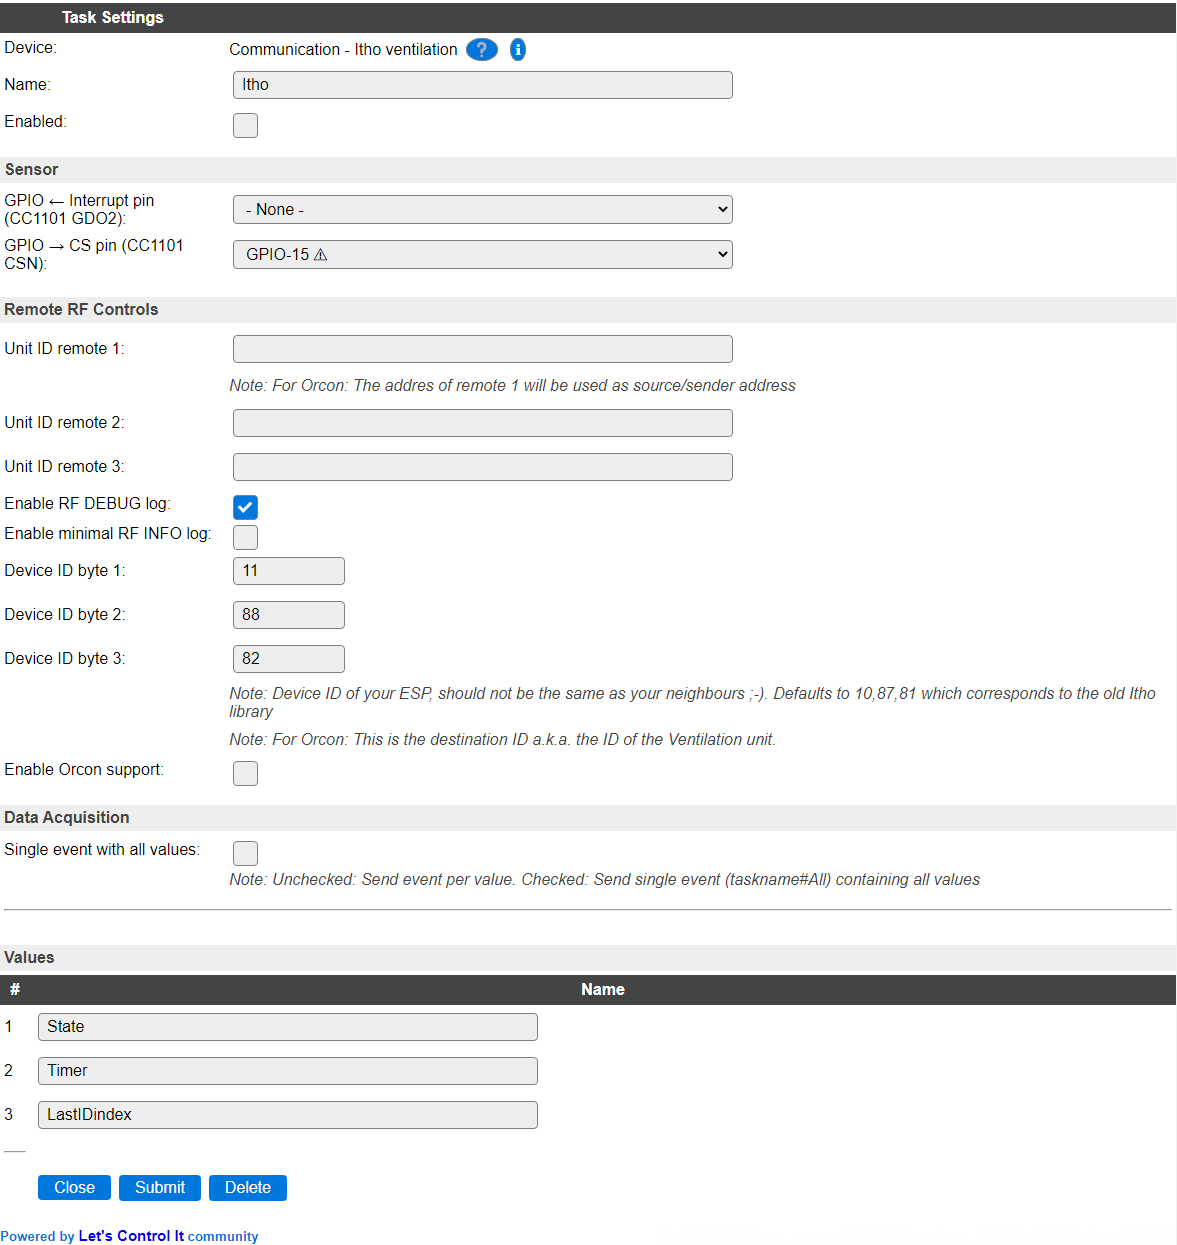
Sensor
GPIO <- Interrupt pin (CC1101 GDO2): Input interrupt pin of the ESPEasy, should be connected to CC1101 GDO2. Don’t use ESP boot related pints (GPIO0, GPIO2, GPIO15) or GPIO16 (no interrupt support). When this setting is set to
- None -it will be iognored, but receiving the messages sent from other controllers is not possible. Sending commands to the ITHO ventilation unit is still possible.GPIO -> CS pin (CC1101 CSN): The output pin to connect to the CS/CSN line of the CC1101 controller. The previous fixed setting of GPIO 15 is filled by default, but can be changed if multiple tranceiver units can be connected to the ESP.
Remote RF Controls
Unit ID remote 1..3: ID of another remote that controls your Itho fan. When set it allows the plugin to monitor for commands and act on them. The ID consist out of 3 numbers separated by ‘,’. Up to 3 remotes are supported. After the controller is joined with the ventilation unit, and enabling the Enable minimal RF INFO log option below, these ID’s can be extracted from the logs at the INFO level by pressing a button on the remote. Most remotes will repeat a command ca. 3 times, in case there is disturbance in communication, so that should be easily recognizable.
Enable RF DEBUG log: When enabled all received RF packages will be shown in the ESPEasy log at DEBUG level. Useful to determine the ID of other remotes and the messages they send. Disable when not necessary to reduce writing to the log. (Only available when Debug logging is available in the build.)
Enable minimal RF INFO lgo: When enabled, this will write the ID and raw command sent from any device using the same frequency and protocol. Can be used to determine entries for Unit ID remote 1..3. Disable when not necessary to reduce writing to the log.
Device ID byte 1..3: Device ID of the ESPEasy plugin, defaults to 10,87,81. The plugin acts as a remote and can have a unique ID. Can be changed from default if you have interference with neighbours. After a change you should again join the ESP with the fan.
Enable Orcon support: Enables the extra protocol for the Orcon brand of ventilation units, that use the same protocol, but with a different command set. To avoid possible interference, it is disabled by default.
Data Acquisition
This group of settings are standard available configuration items.
Single event with all values: When this setting is enabled, all available values will be sent in a single event
<TaskName>#All, with all values in order as arguments to the event.Show derived values: When checked, the Devices overview page, and the
/jsonendpoint (used for updating the Devices overview page) will include any Derived values as defined. See theTaskValueSetDerivedandTaskValueSetPresentationcommands.Event & Log derived values: When checked, the Derived values will be generated as Events, to be handled in Rules, and sent to logging devices like the Syslog server and/or SD-card logging.
(The derived values options are only available if String variables feature is included in the build.)
Send to Controller: Select the Controller(s) to send the Values to, either on a
TaskRuncommand applied to the task, or on an Interval time action.
Send to Controller is only visible when one or more Controllers are configured.
Depending on the controller capabilities, some configuration settings may be shown:

All configured Controllers are shown here, including the enabled or disabled state (multiple Controllers can be enabled, only a single MQTT Controller can be enabled at one time!).
For each controller the user can select wether the data should be sent on each Interval (or explicit TaskRun).
For the Domoticz controllers the value index (IDX) has to be configured.
For some controllers, like Home Assistant/openHAB, there are extra options available.
Group: This represents the group id to combine all values from multiple tasks into a single grouped-device during MQTT AutoDiscovery. Groups, by design, can span multiple ESPEasy devices, if desired, as long as the Task/Valuename combinations are unique. If a group should only combine Tasks from a single ESPEasy unit, the group id should be unique across multiple ESPEasy units. The group description, default Group <n>, can be adjusted in Home Assistant. If the Group value matches the current Unit nr, the Unit name,
%sysname%, is used instead of Group <nr>.Retained: For MQTT Controllers, this setting can be enabled to send the values for the current task with the Retain flag set. The Publish Retain flag in the Controller settings will override this by sending all task values with Retain flag enabled.
Send derived: This checkbox determines if any configured Derived values should also be sent to the controller (and included in the AutoDiscovery if that’s available and enabled).
Resend MQTT Discovery: When checked, will start a resend of the MQTT Discovery process for this task after a random delay, when Submit is clicked, so any changed settings will be updated in the MQTT broker. This setting is only available if the controller is enabled, the Auto Discovery feature is available and enabled for the controller. This setting is not stored.
Other controllers, like f.e. FHEM HTTP, do not support additional settings besides the checkbox to enable sending the data.
Values
The plugin has 3 values to indicate the status of the fan:
State shows the state of the last command send to the fan
Timer shows the value of the timer
LastIDindex shows the index of the last remote from which a command was received (1 to 3)
Commands available
Command Syntax |
Extra information |
|---|---|
itho,<state>(Command was
state, but that has been deprecated) |
Use the states in the table below to control the state of the fan. To pair the remote with the Itho fan use 1111 to join, or 9999 to leave/unjoin, respectively.
|
Examples:
HTTP control: http://ip/control?cmd=ITHO,1
MQTT conrol: mosquitto_pub -t /Fan/cmd -m ‘itho 1’ Here ‘Fan’ is the name of the plugin
Fan states
State |
Name |
Description |
|---|---|---|
0 |
Standby |
Itho ventilation unit on standby (not supported on most models) |
1 |
Low |
Itho ventilation to lowest speed |
2 |
Medium |
Itho ventilation to medium speed |
3 |
High |
Itho ventilation to high speed |
4 |
Full |
Itho ventilation to full speed (same as high on most models) |
13 |
Timer1 |
Itho to high speed with hardware timer (10 min) |
23 |
Timer2 |
Itho to high speed with hardware timer (20 min) |
33 |
Timer3 |
Itho to high speed with hardware timer (30 min) |
1111 |
Join with an ITHO ventilation unit that is waiting for join requests (first minutes after power-on) |
|
9999 |
Leave connection with an ITHO ventilation unit (maybe not supported on all models). Needs a new Join (1111) to be able to control a unit. |
|
100 |
Orcon standBy |
Orcon ventilation unit on standby |
101 |
Orcon low speed |
Orcon ventilation to lowest speed |
102 |
Orcon medium speed |
Orcon ventilation to medium speed |
103 |
Orcon high speed |
Itho ventilation to high speed |
104 |
Orcon auto speed |
Itho ventilation to auto speed (based on Humidity and/or CO2) |
110 |
Orcon Timer 0 |
Orcon ventilation unit on standby for 12*60 minutes |
111 |
Orcon Timer 1 |
Orcon ventilation to lowest speed for 60 minutes |
112 |
Orcon Timer 2 |
Orcon ventilation unit to medium speed for 13*60 minutes |
113 |
Orcon Timer 3 |
Orcon ventilation unit to high speed for 60 minutes |
114 |
Orcon Auto CO2 |
Itho ventilation to auto speed for 60 minutes (based on Humidity and/or CO2) |
Two special states exist: 1111 for a join command and 9999 for a leave/unjoin command, check the Itho manual on how to put your fain into pairing mode.
For Orcon the Unit ID remote 1 will be used as the spoofed sender ID
Rules examples
Below an example on how to synchronize the plugin with a level switch in Domoticz
on Itho#State do
 if [Itho#State]=0
  Publish domoticz/in,'{"command":"switchlight","idx":IDX,"switchcmd":"Set Level","level":0}'
 elseif [Itho#State]=1
  Publish domoticz/in,'{"command":"switchlight","idx":IDX,"switchcmd":"Set Level","level":10}'
 elseif [Itho#State]=2
  Publish domoticz/in,'{"command":"switchlight","idx":IDX,"switchcmd":"Set Level","level":20}'
 elseif [Itho#State]=3
  Publish domoticz/in,'{"command":"switchlight","idx":IDX,"switchcmd":"Set Level","level":30}'
 elseif [Itho#State]=4
  Publish domoticz/in,'{"command":"switchlight","idx":IDX,"switchcmd":"Set Level","level":40}'
 elseif [Itho#State]=13
  if [Itho#Timer]=599
   Publish domoticz/in,'{"command":"switchlight","idx":IDX,"switchcmd":"Set Level","level":50}'
  endif
 elseif [Itho#State]=23
  if [Itho#Timer]=1199
   Publish domoticz/in,'{"command":"switchlight","idx":IDX,"switchcmd":"Set Level","level":60}'
  endif
 elseif [Itho#State]=33
  if [Itho#Timer]=1799
   Publish domoticz/in,'{"command":"switchlight","idx":IDX,"switchcmd":"Set Level","level":70}'
  endif
 endif
endon
Change log
Changed in version 2.0: .
changed
2023-03-05: Deprecate state command, introduce itho command.
- added
2022-08-18: Add support for Orcon devices.
- added
2022-08-10: Made multi-instance compatible, CS pin configurable and interrupt pin usage optional.
- added
2021-12-26 Initial release version.