Output - I2C Multi Relay
Seeed Studio I2C Multi Relay boards
Plugin details
Type: Output
Name: MultiRelay
Status ESP32: COLLECTION D
Status ESP8266: COLLECTION D
GitHub: P124_MultiRelay.ino
Maintainer: tonhuisman
Used libraries: https://github.com/Seeed-Studio/Multi_Channel_Relay_Arduino_Library (modified local copy)
Description
This plugin is the interface to the Seeed Studio I2C multi relay boards (either solid state or mechanical).
Each channel can be switched separately, or multiple relays at once, by sending the appropriate commands (see below).
Supported hardware
Configuration
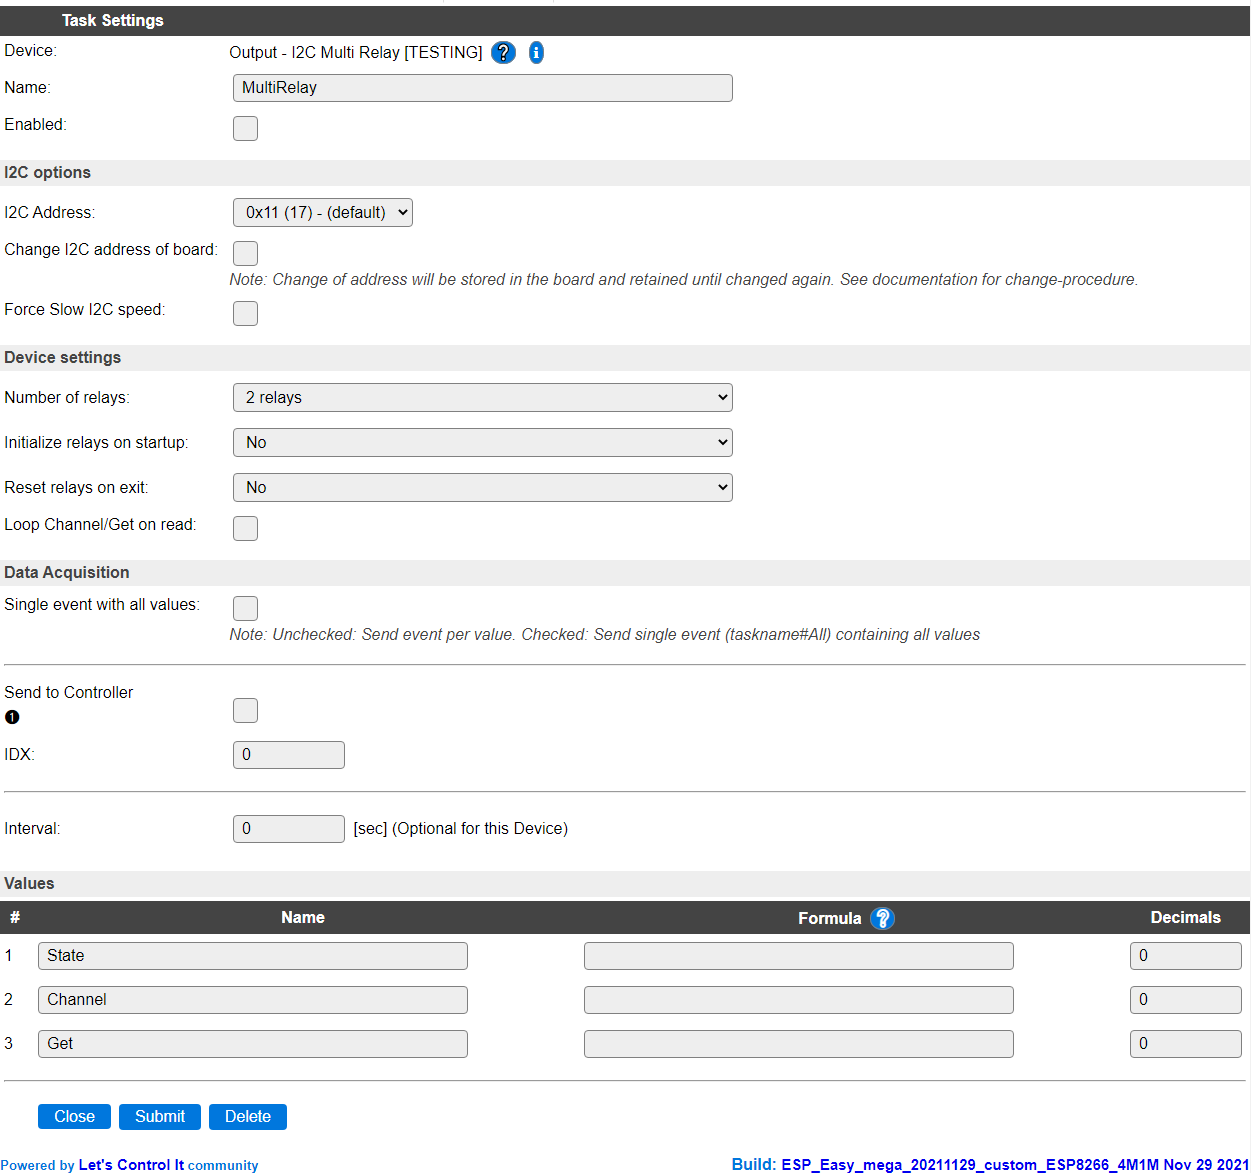
Name: A unique name should be entered here.
Enabled: The device can be disabled or enabled. When not enabled the device should not use any resources.
I2C Options
The available settings here depend on the build used. At least the Force Slow I2C speed option is available, but selections for the I2C Multiplexer can also be shown. For details see the I2C Bus page
I2C Address: The address the device is using.
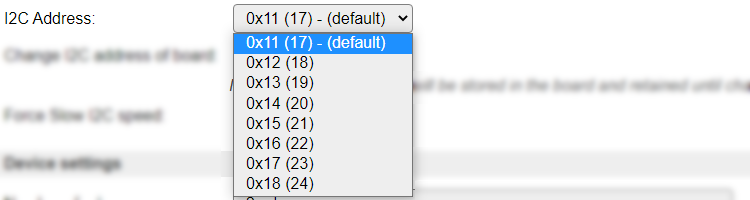
Change I2C address of board: These boards allow to change their I2C address. Once changed the address will be retained in the board non-volatile memory, until changed again. Currently addresses
0x11to0x18are supported.
The procedure to change the address is:
Connect only 1 of these boards to the I2C bus (other I2C devices can stay connected)
Select the current board address in the I2C Address field. Use the Tools / I2C Scanner feature to retrieve the current board address, if needed.
Enable the Change I2C address of board option.
Submit the page (saving the settings). This will increment the board’ I2C address to the next one in the list.
Optional: Use the Tools / I2C Scanner feature to verify that the board now has the next address.
The I2C Address of the task will be updated to the new address.
Repeat above steps until the desired address is set. After reaching the highest address, the default address
0x11will be set.Save the settings using the Submit button.
After changing the address, a next board can be connected that uses another board address, most likely 0x11. Each board will require an additional task to be configured.
Device Settings
Number of relays: Select the number of relays on the board connected.

When changing the number of relays, the page will be submitted and the settings saved.
Initialize relays on startup: To initialize the relay on/off state after startup of the plugin, this option can be set to Yes. When changing the setting the page will be submitted and the settings saved.

Apply initial state always: Off by default, then the initialization state will be sent only once after a restart of the ESP unit. When Enabled the initialization state will be sent on every start of the plugin, like after a Submit of the settings page.
Relay # initial state (on/off): The on or off state the relay should be set to on initialization of the plugin. Will show a checkbox for the number of relays configured (2, 4 or 8).
Reset relays on exit: To set the relay on/off state when the plugin is disabled, this option can be set to Yes. When changing the setting the page will be submitted and the settings saved.

Relay # exit-state (on/off): The on or off state the relay should be set to when the plugin is disabled. Will show a checkbox for the number of relays configured (2, 4 or 8).
Note
This will also be applied when Submitting the device settings page!
Loop Channel/Get on read: When enabled, will update the Channel and Get values with the selected channel and its current state (0=off, 1=on). The channel will be incremented each interval (read action).
Data Acquisition
This group of settings are standard available configuration items.
Single event with all values: When this setting is enabled, all available values will be sent in a single event
<TaskName>#All, with all values in order as arguments to the event.Show derived values: When checked, the Devices overview page, and the
/jsonendpoint (used for updating the Devices overview page) will include any Derived values as defined. See theTaskValueSetDerivedandTaskValueSetPresentationcommands.Event & Log derived values: When checked, the Derived values will be generated as Events, to be handled in Rules, and sent to logging devices like the Syslog server and/or SD-card logging.
(The derived values options are only available if String variables feature is included in the build.)
Send to Controller: Select the Controller(s) to send the Values to, either on a
TaskRuncommand applied to the task, or on an Interval time action.
Send to Controller is only visible when one or more Controllers are configured.
Depending on the controller capabilities, some configuration settings may be shown:

All configured Controllers are shown here, including the enabled or disabled state (multiple Controllers can be enabled, only a single MQTT Controller can be enabled at one time!).
For each controller the user can select wether the data should be sent on each Interval (or explicit TaskRun).
For the Domoticz controllers the value index (IDX) has to be configured.
For some controllers, like Home Assistant/openHAB, there are extra options available.
Group: This represents the group id to combine all values from multiple tasks into a single grouped-device during MQTT AutoDiscovery. Groups, by design, can span multiple ESPEasy devices, if desired, as long as the Task/Valuename combinations are unique. If a group should only combine Tasks from a single ESPEasy unit, the group id should be unique across multiple ESPEasy units. The group description, default Group <n>, can be adjusted in Home Assistant. If the Group value matches the current Unit nr, the Unit name,
%sysname%, is used instead of Group <nr>.Retained: For MQTT Controllers, this setting can be enabled to send the values for the current task with the Retain flag set. The Publish Retain flag in the Controller settings will override this by sending all task values with Retain flag enabled.
Send derived: This checkbox determines if any configured Derived values should also be sent to the controller (and included in the AutoDiscovery if that’s available and enabled).
Resend MQTT Discovery: When checked, will start a resend of the MQTT Discovery process for this task after a random delay, when Submit is clicked, so any changed settings will be updated in the MQTT broker. This setting is only available if the controller is enabled, the Auto Discovery feature is available and enabled for the controller. This setting is not stored.
Other controllers, like f.e. FHEM HTTP, do not support additional settings besides the checkbox to enable sending the data.
Values
The Values available for this sensor, are State, holding the decimal value of the current channel_bitmap, Channel and Get, showing the channel and its on/off state (1/0) of the last multirelay,get,<channel> command or when Loop Channel/Get on read is checked.
Commands available
Command Syntax |
Extra information |
|---|---|
multirelay,on,<channel> |
Switch on the relay at the channel given. Range is 1..8, but limited to the number the plugin is configured for.
|
multirelay,off,<channel> |
Switch off the relay at the channel given. Range is 1..8, but limited to the number the plugin is configured for.
|
multirelay,set,<channel_bitmap> |
Switch on and off according to the bitmap provided, in 8..1 order. The bitmap can be given in decimal (
nn, 1-3 digits, 0 to 9), hexadecimal (0xnn, 1 or 2 digits, 0 to f) or binary (0bnnnnnnnn, 1 to 8 digits, 0 or 1) notation. |
multirelay,get,<channel> |
Get the current state of the requested channel (checked for being in range 1 to the number of relays configured), and put that in the Channel and Get values, so it will be available to rules or a configured controller.
|
multirelay,loop,0|1 |
Disable or enable getting the next channel state on every Interval read. Corresponds to the Loop Channel/Get on read option in the device settings, but does not check/uncheck that setting.
|
Change log
Changed in version 2.0: …
added 2021-11-19 Initial release version.